Winfig Browsers: Automated Browser Setup & Customization

Overview
Winfig Browsers provides one-click automation scripts to install, configure, and optimize your favorite browsers—Edge, Brave, and Zen—for privacy, productivity, and a beautiful Windows experience. Instantly apply custom settings, extensions, themes, and privacy tweaks across all supported browsers.
Supported Browsers
- Microsoft Edge (Chromium)
- Brave Browser
- Zen Browser
Why Use Winfig Browsers?
- Save time with automated, repeatable browser setup
- Instantly apply privacy, security, and UI tweaks
- Sync extensions, bookmarks, and settings across devices
- Remove bloatware and disable telemetry with one command
- Consistent look and feel across all browsers
Features
| Feature | Description |
|---|---|
| Automated Install | One-command install for Edge, Brave, and Zen |
| Privacy Hardening | Disables telemetry, tracking, and ads by default |
| Extension Sync | Installs your favorite extensions automatically |
| Custom Themes | Applies Catppuccin or your preferred theme for a beautiful UI |
| Bookmarks Import | Syncs bookmarks from your Winfig profile |
| Default Settings | Sets preferred search engine, homepage, and new tab page |
| Bloatware Removal | Removes pre-installed/promotional content |
| Cross-Browser Profiles | Ensures consistent profiles and settings across all supported browsers |
| Scriptable Actions | Easily extend with your own PowerShell or shell scripts |
| Portable & Reproducible | Works on fresh installs, VMs, and multi-user setups |
Microsoft Edge Setup
Requirements
- MsEdge installed on Windows 11
- PowerShell 5+ for automation and scripting
- Git for automation script.
- Administrator privileges for certain configurations
- Internet access for downloading dependencies
Pre-Installation
Before running the Winfig automation, it’s recommended to declutter your Edge home page for a cleaner, distraction-free experience. Follow these steps:
Edge Home Page Cleanup
- Open Microsoft Edge
- Navigate to the Home Page and click the Settings icon.
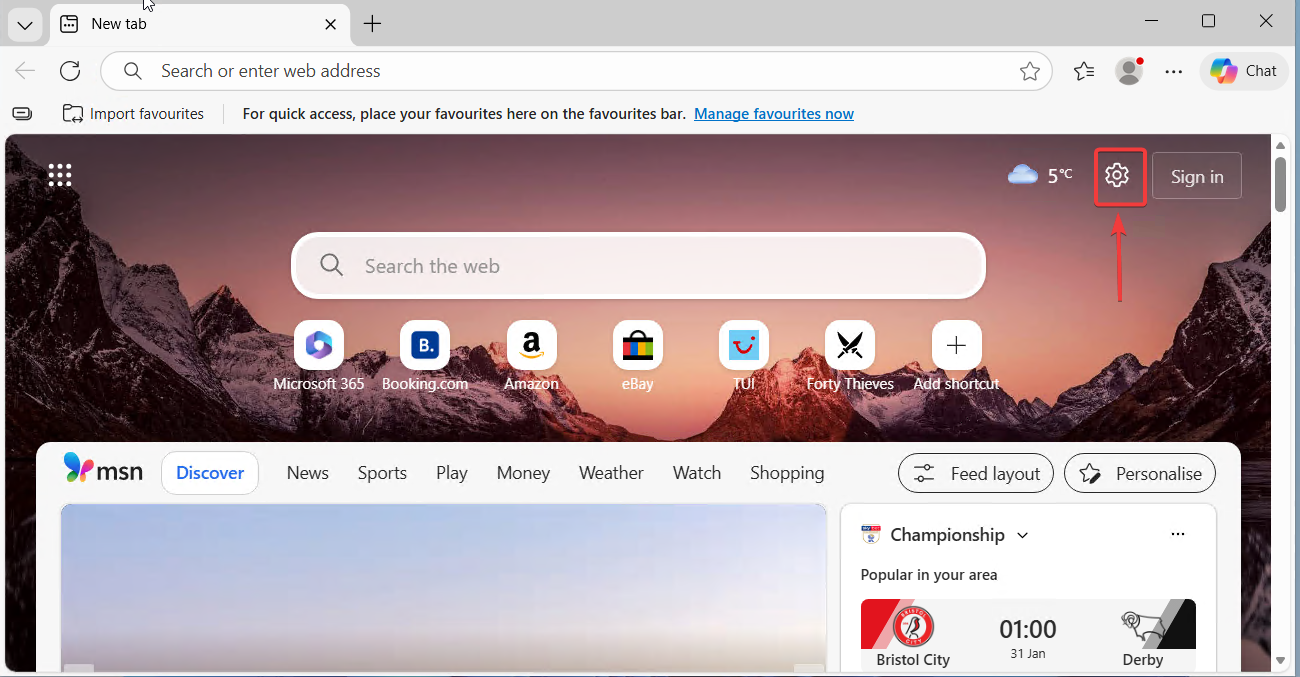
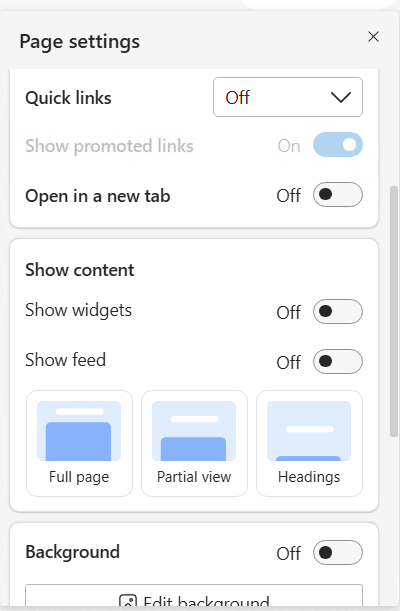
- In the settings panel, adjust the following toggles for a minimal look:
- Quick Links: Set to
Off - Open in New Tab: Set to
Off - Show Feed: Set to
Off - Background: Set to
Off - Show Weather: Set to
Off
- Quick Links: Set to
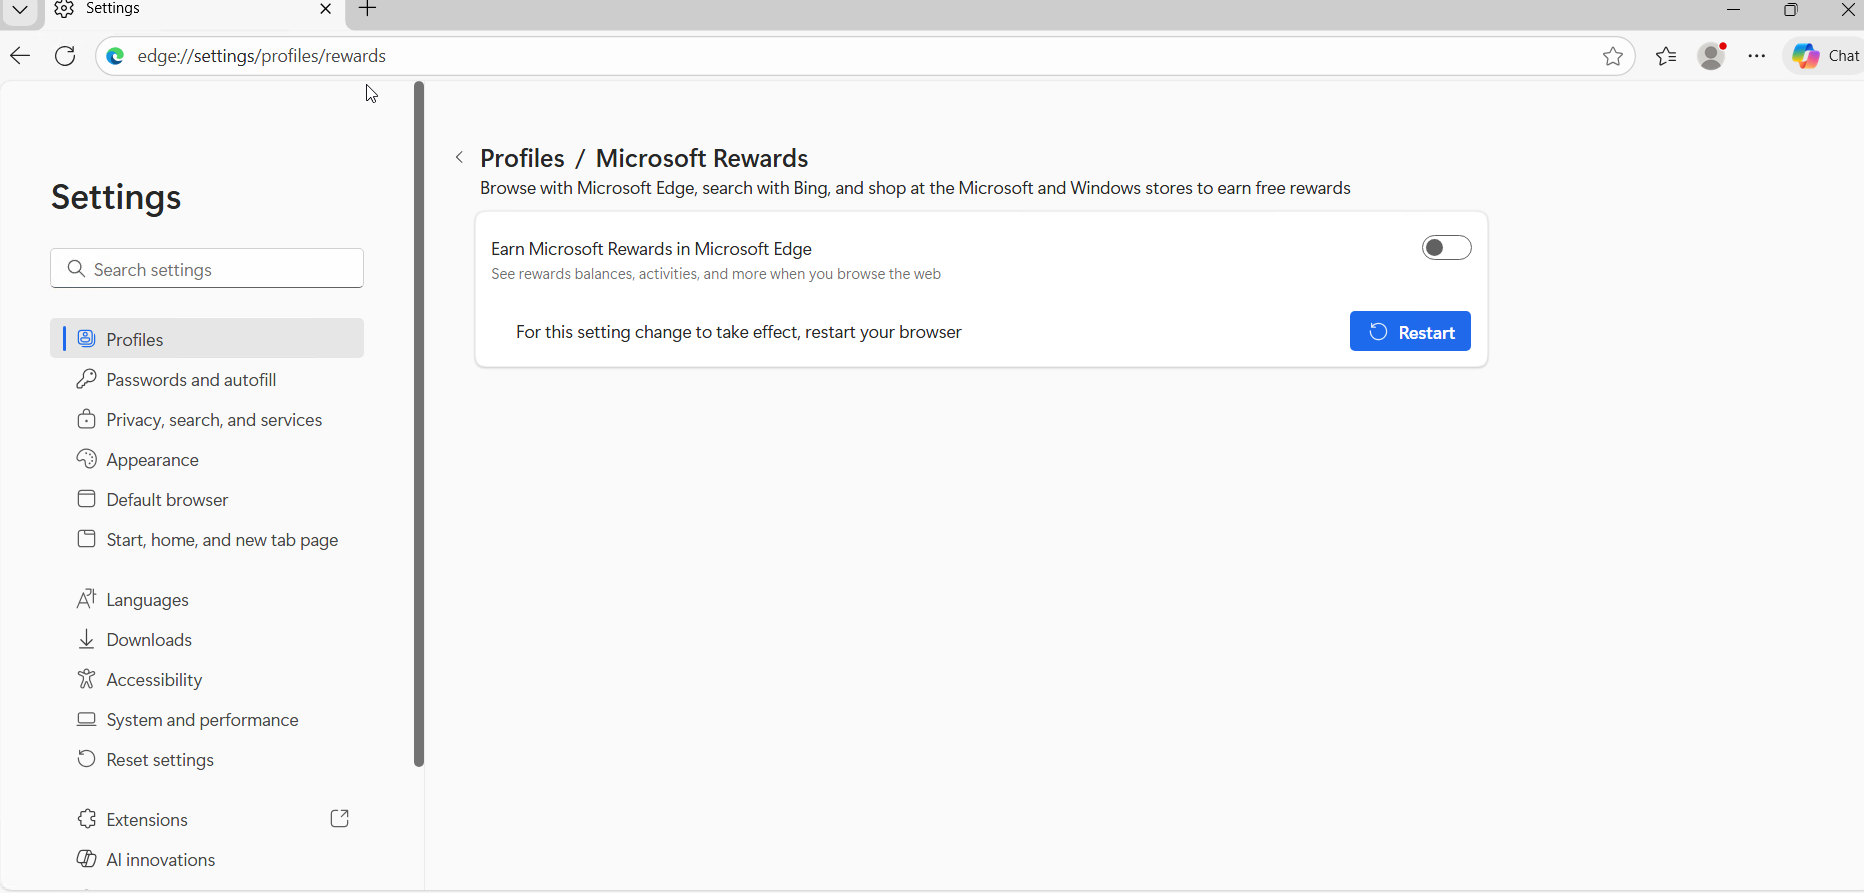
Edge Rewards
- Navigate to edge://settings/profiles/rewards
- Edge Rewards: Set to
Off
- Edge Rewards: Set to
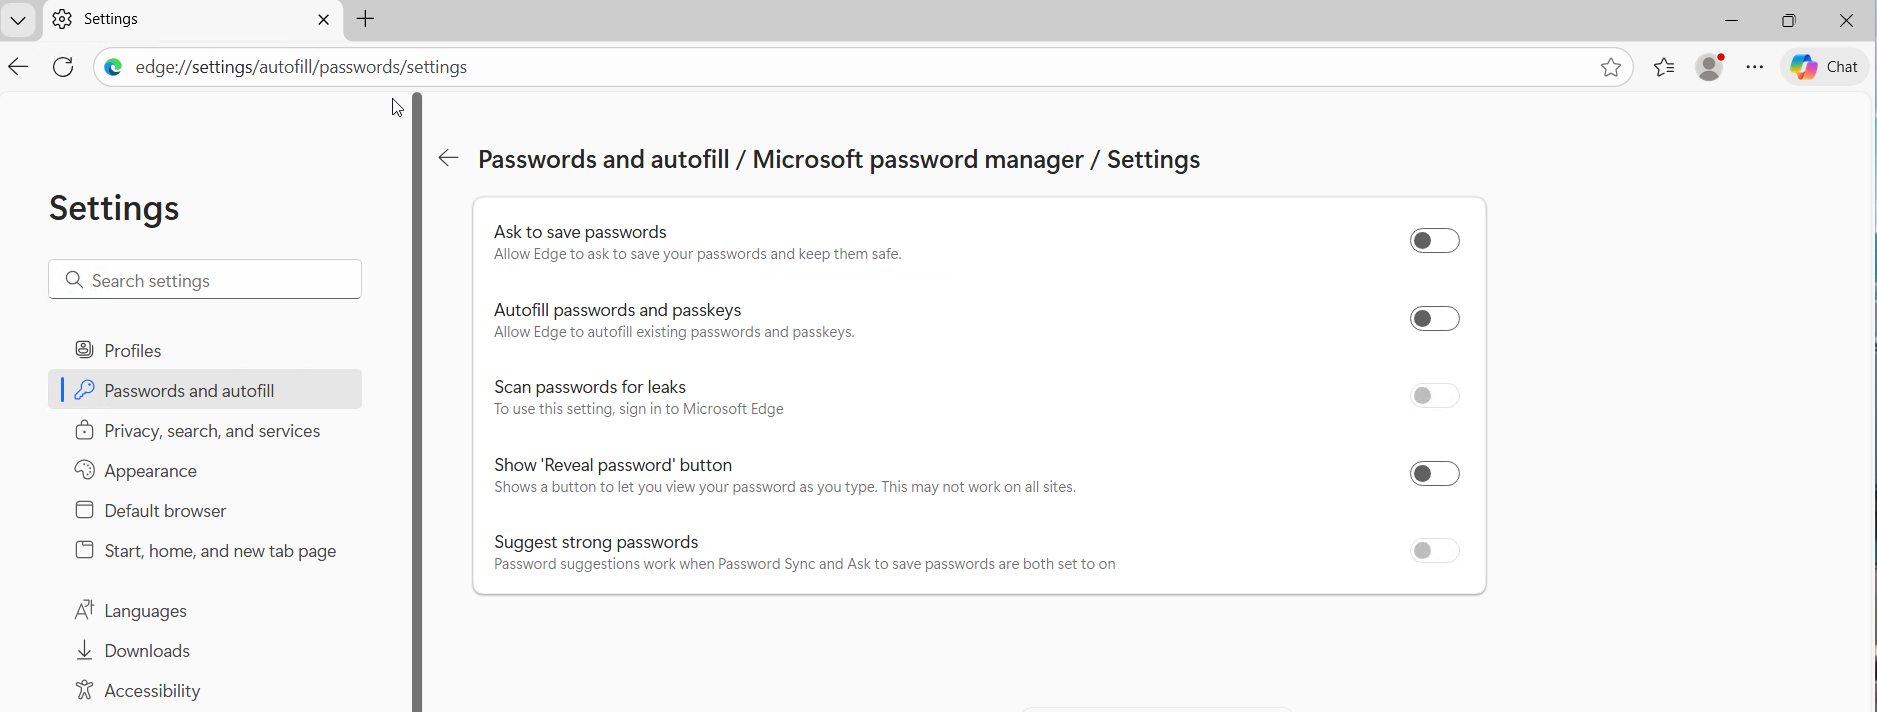
Password Autofill Settings
- Navigate to edge://settings/autofill/passwords/settings
- Ask to Save Password: Set to
Off - Autofill Password: Set to
Off - Show Reveal Button: Set to
Off - Set Strong Passwords: Set to
Off
- Ask to Save Password: Set to
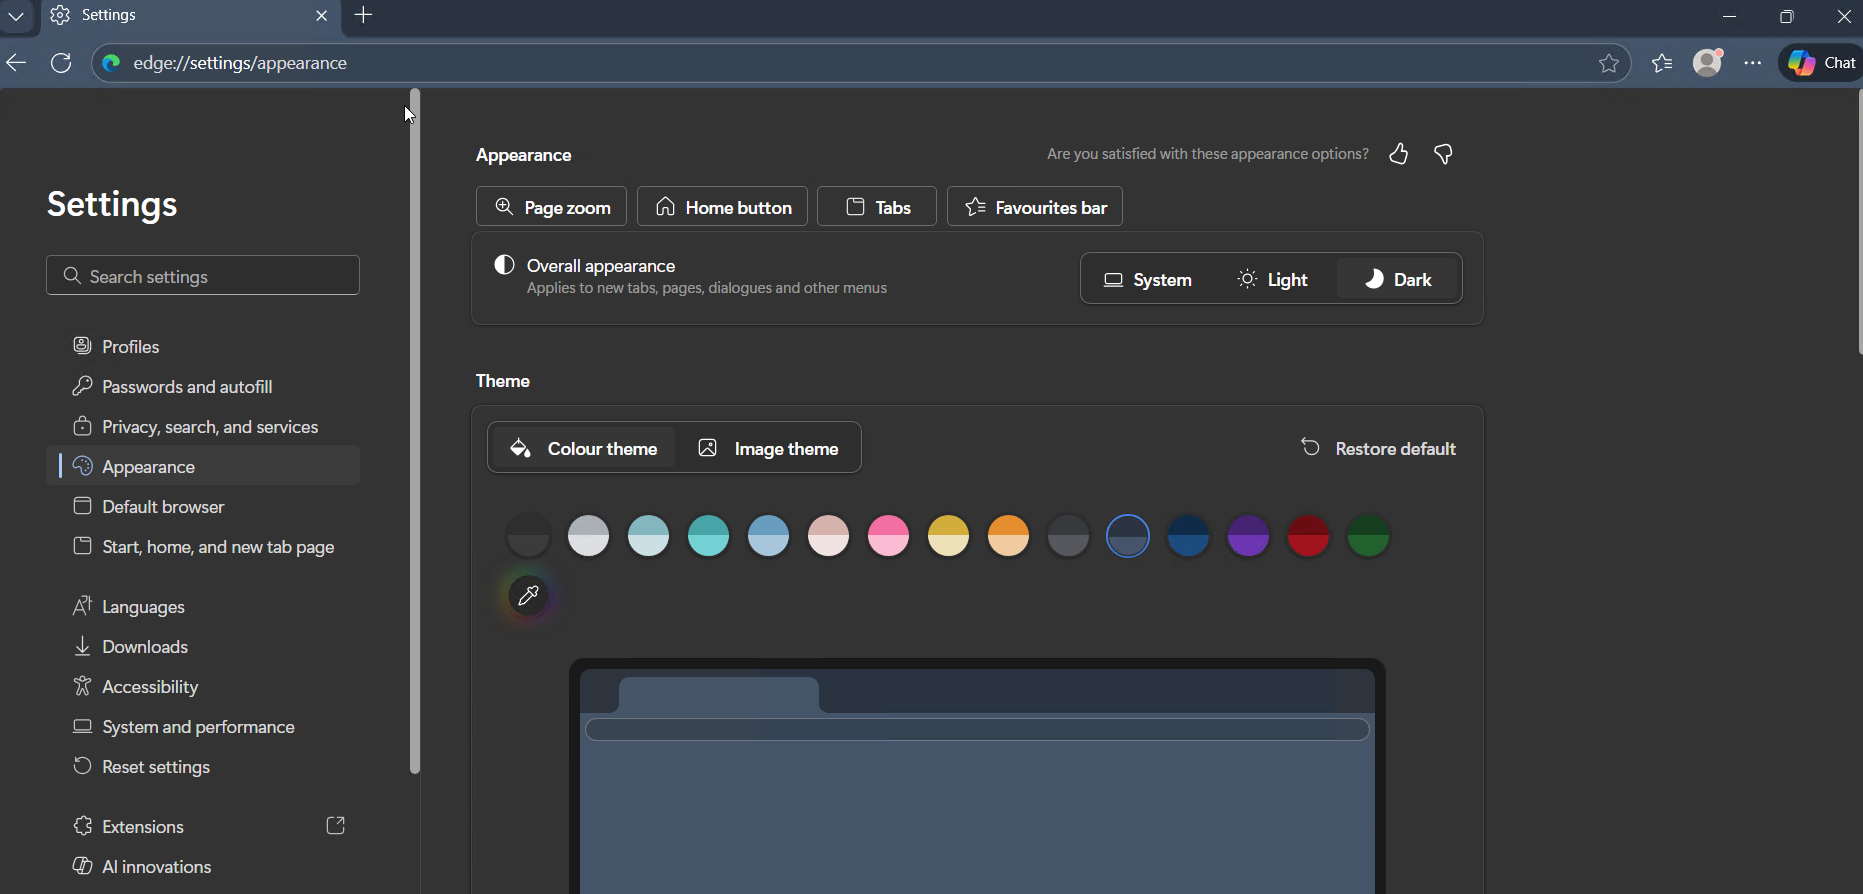
Appearance
- Navigate to edge://settings/appearance
- Overall Appearance: Set to
Dark - Theme: Set to a dark shade
- Overall Appearance: Set to
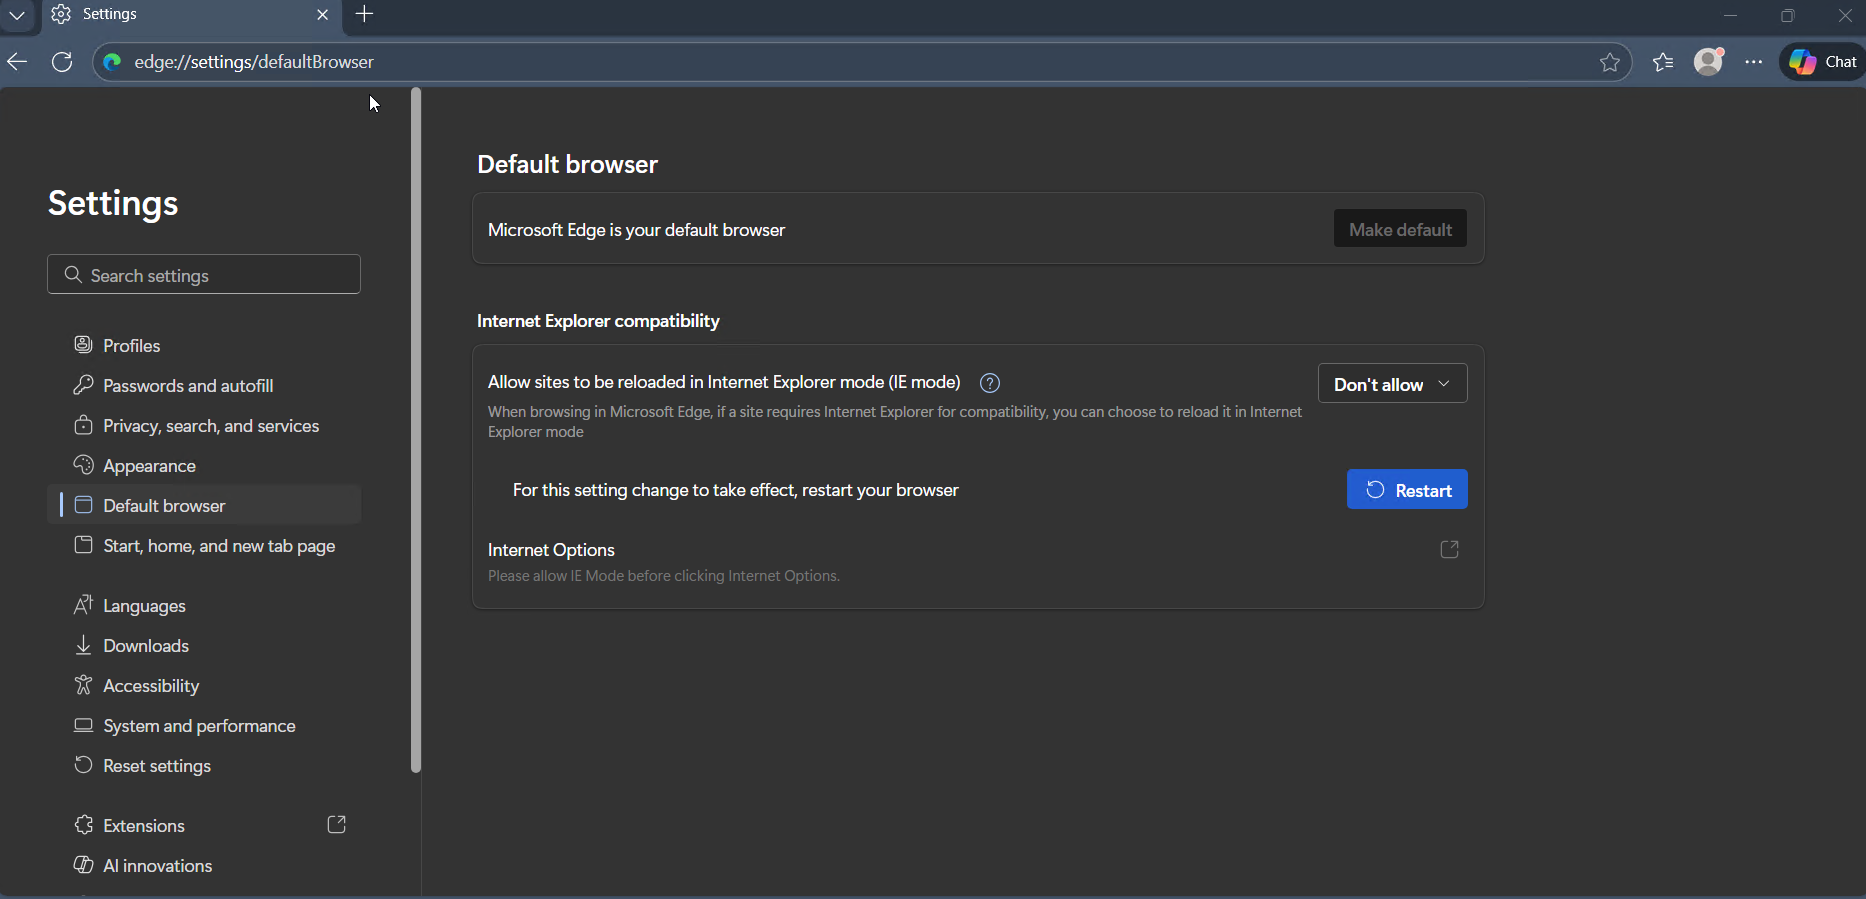
Default Browser
- Navigate to edge://settings/defaultBrowser
- Allow Sites to reload in Internet Explorer: Set to
Don't Allow
- Allow Sites to reload in Internet Explorer: Set to
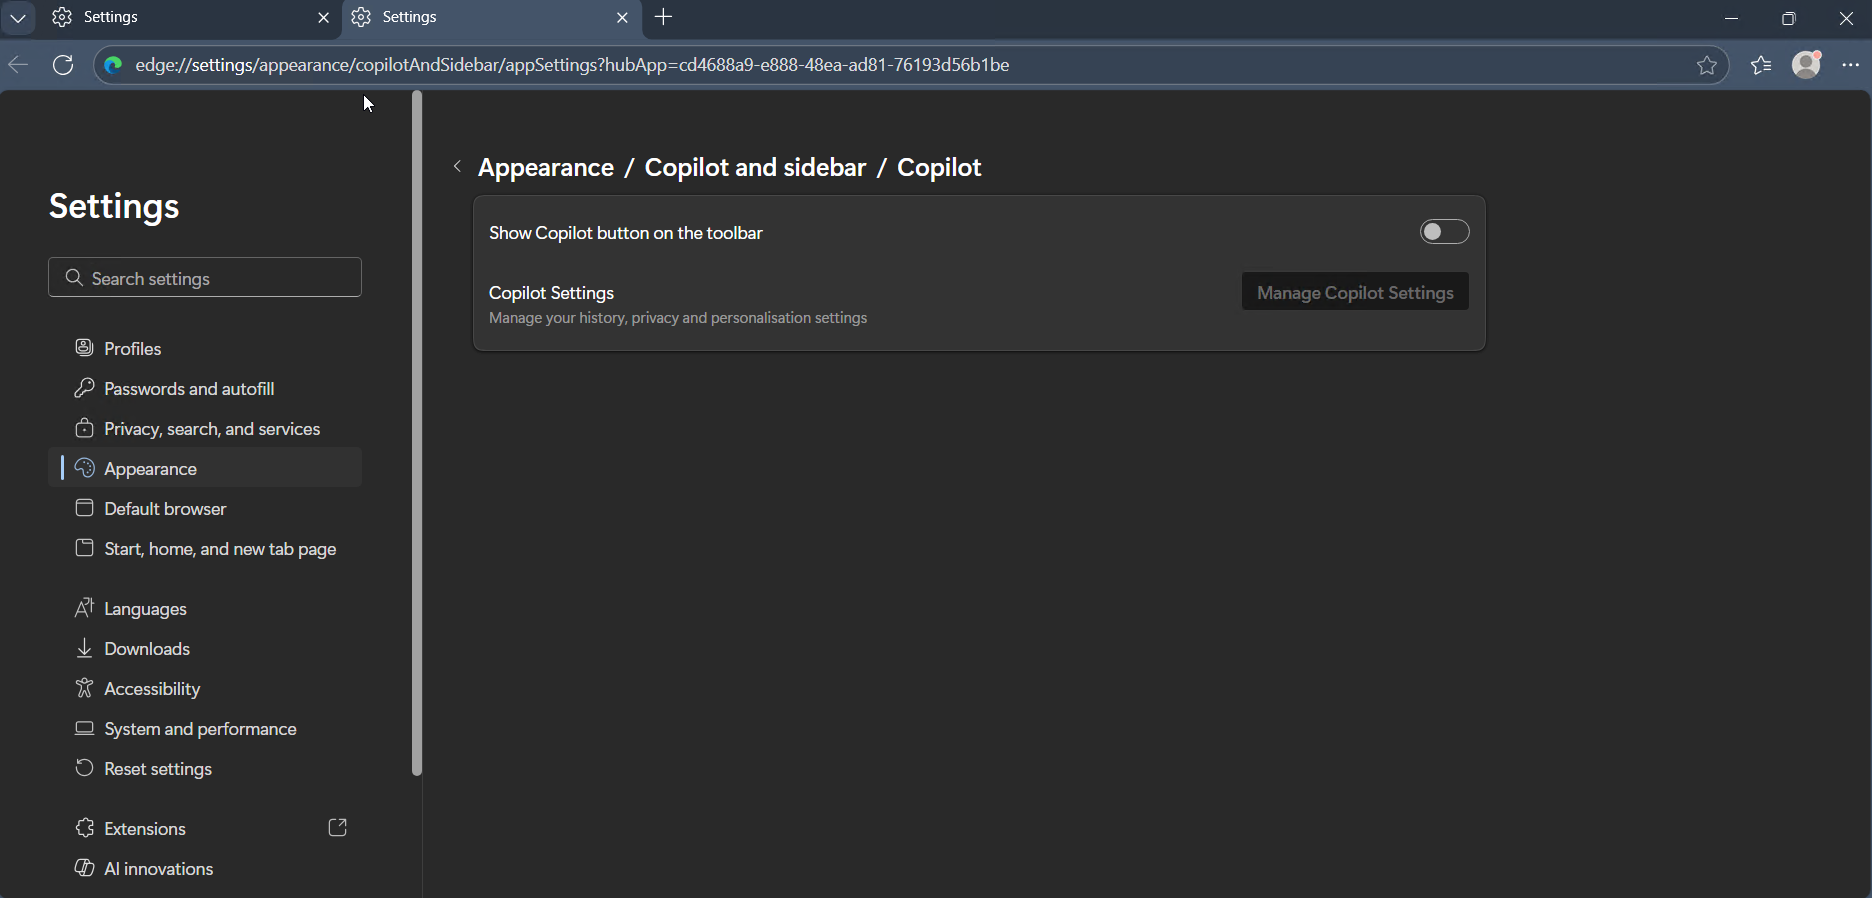
Copilot & Sidebar
- Navigate to edge://settings/appearance/copilotAndSidebar/appSettings?hubApp=cd4688a9-e888-48ea-ad81-76193d56b1be
- Show Copilot Button on toolbar: Set to
Off
- Show Copilot Button on toolbar: Set to
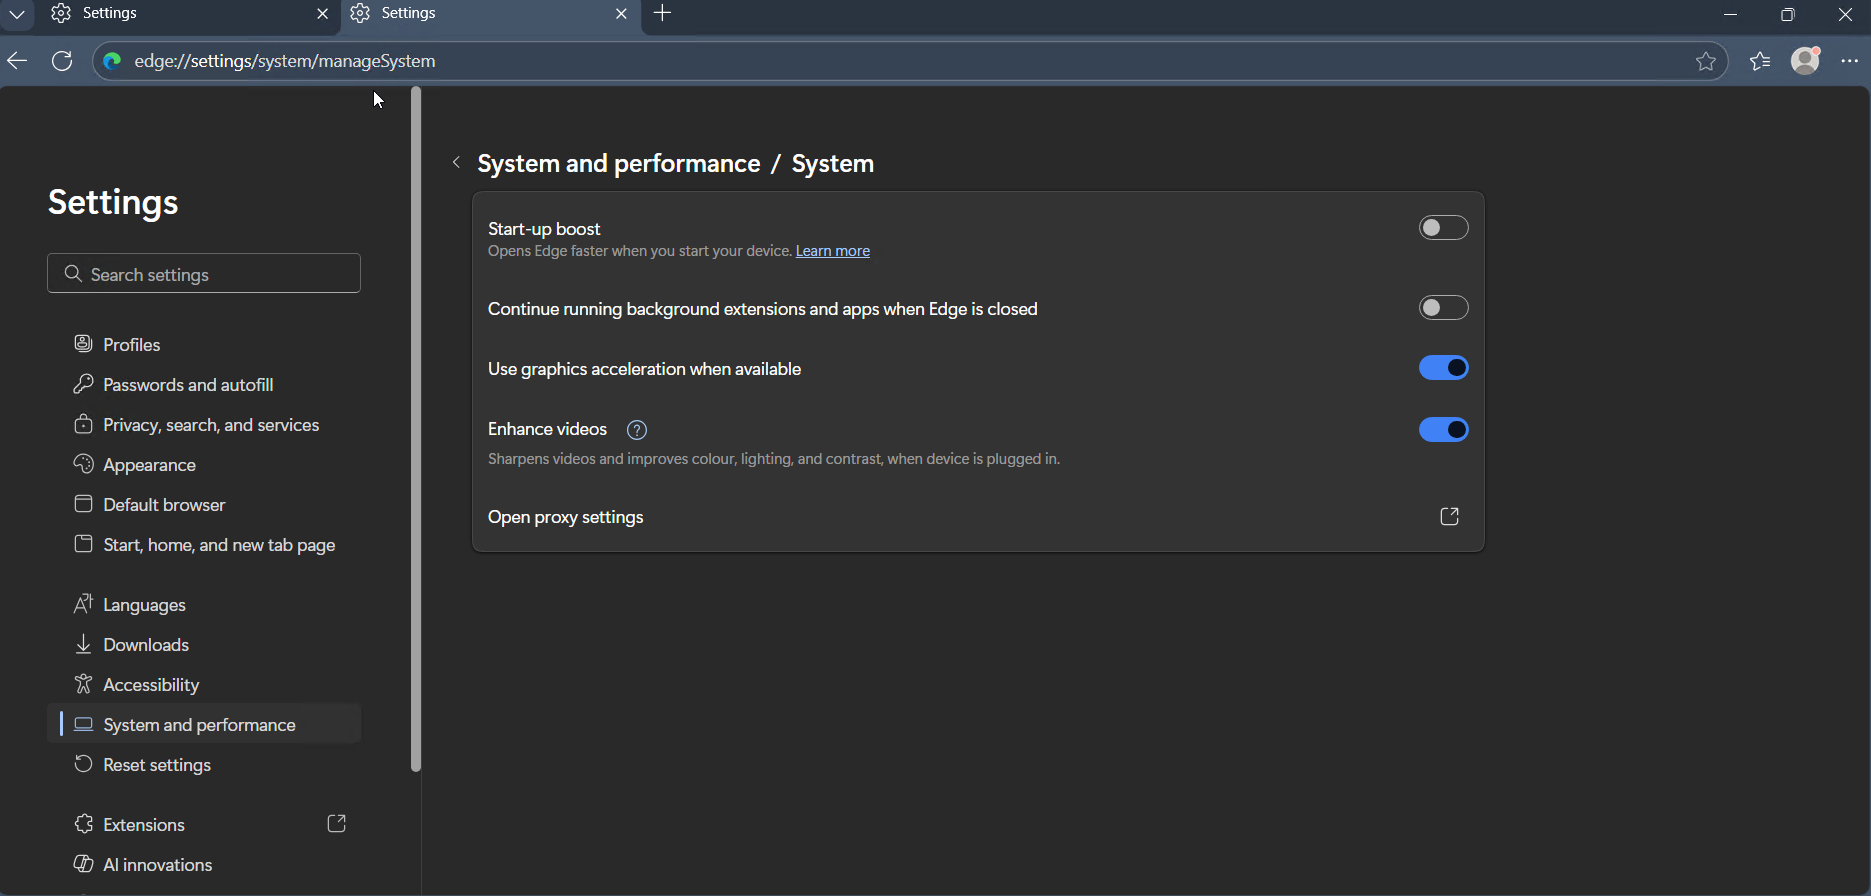
System Settings
- Navigate to edge://settings/system/manageSystem
- Start at Boot: Set to
Off - Continue to run extensions in background: Set to
Off
- Start at Boot: Set to
Toolbar Customization
- Navigate to edge://settings/appearance/toolbar
- Show briefcase icon to represent workspace: Set to
Off - Home: Set to
On - Extensions: Set to
Always show - Split Screen: Set to
On - Downloads: Set to
On
- Show briefcase icon to represent workspace: Set to

Enable Vertical Tabs
Vertical tabs in Microsoft Edge help you organize and manage multiple tabs more efficiently, especially on widescreen monitors. Here’s how to enable and use them:
- Right-click on any open browser tab at the top of the Edge window.
- In the context menu, select "Turn on vertical tabs". You can also use the shortcut Ctrl + Shift + , for quick access.
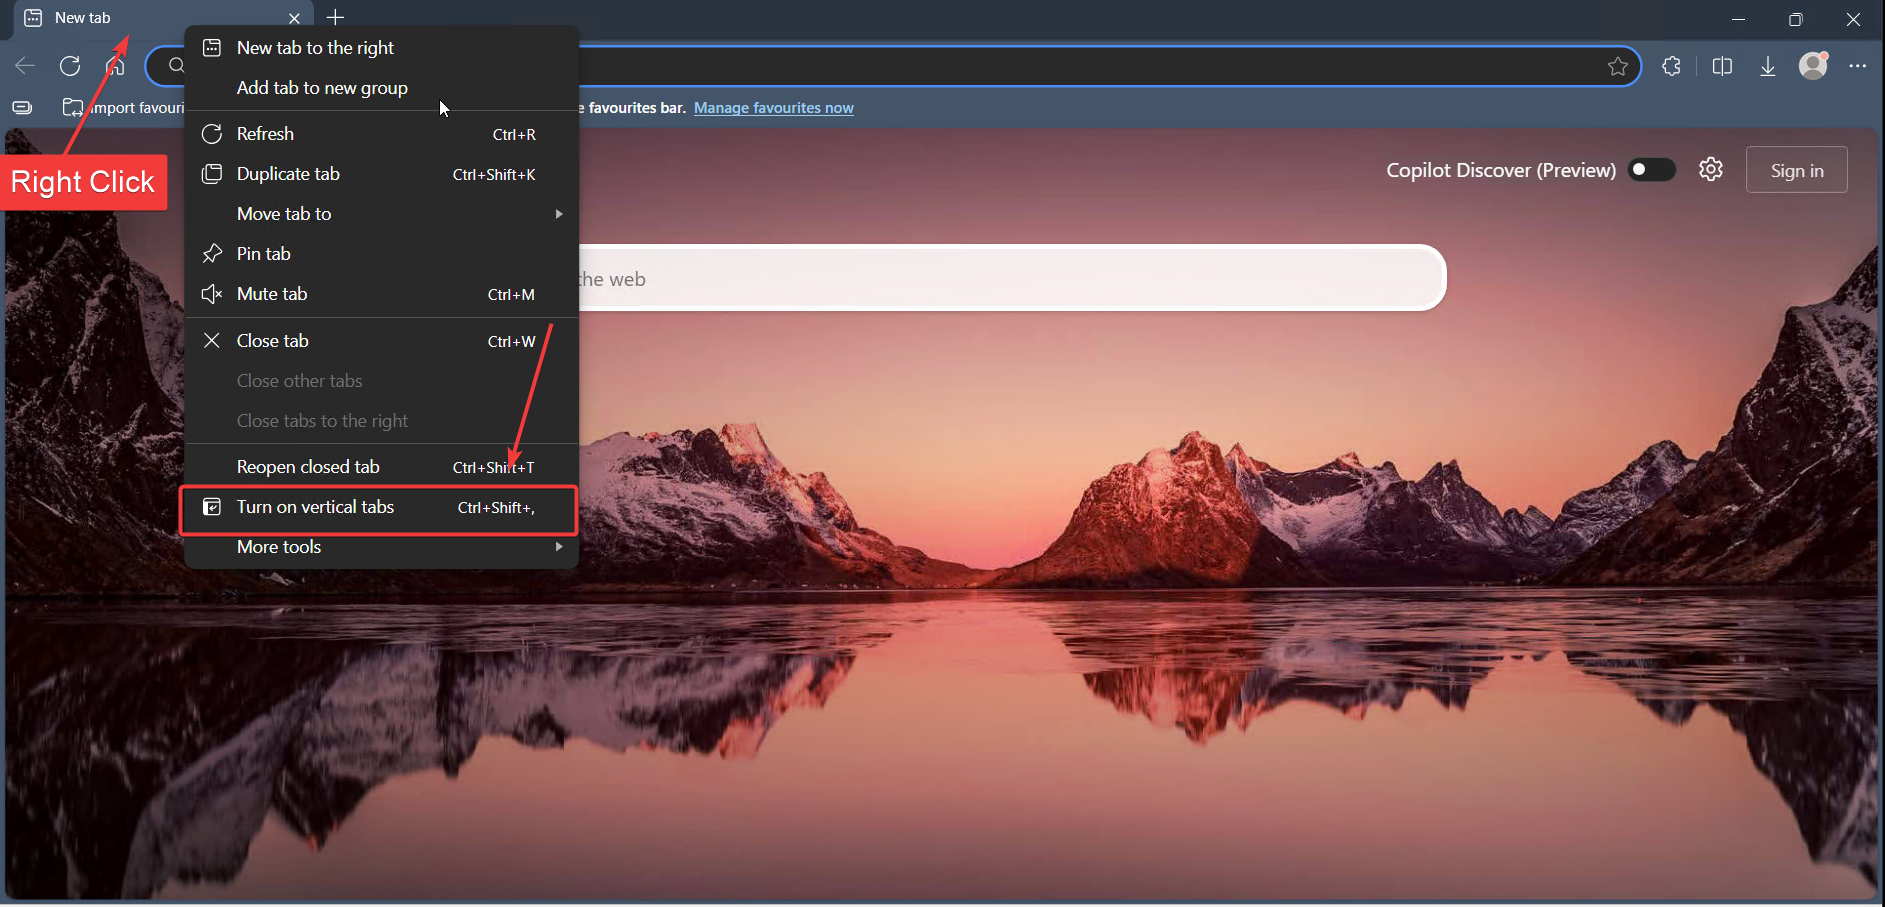
- Once vertical tabs are enabled, you’ll see your tabs listed vertically on the left side of the browser.
- To maximize your workspace, click the Collapse Panel button to hide tab labels and show only icons.
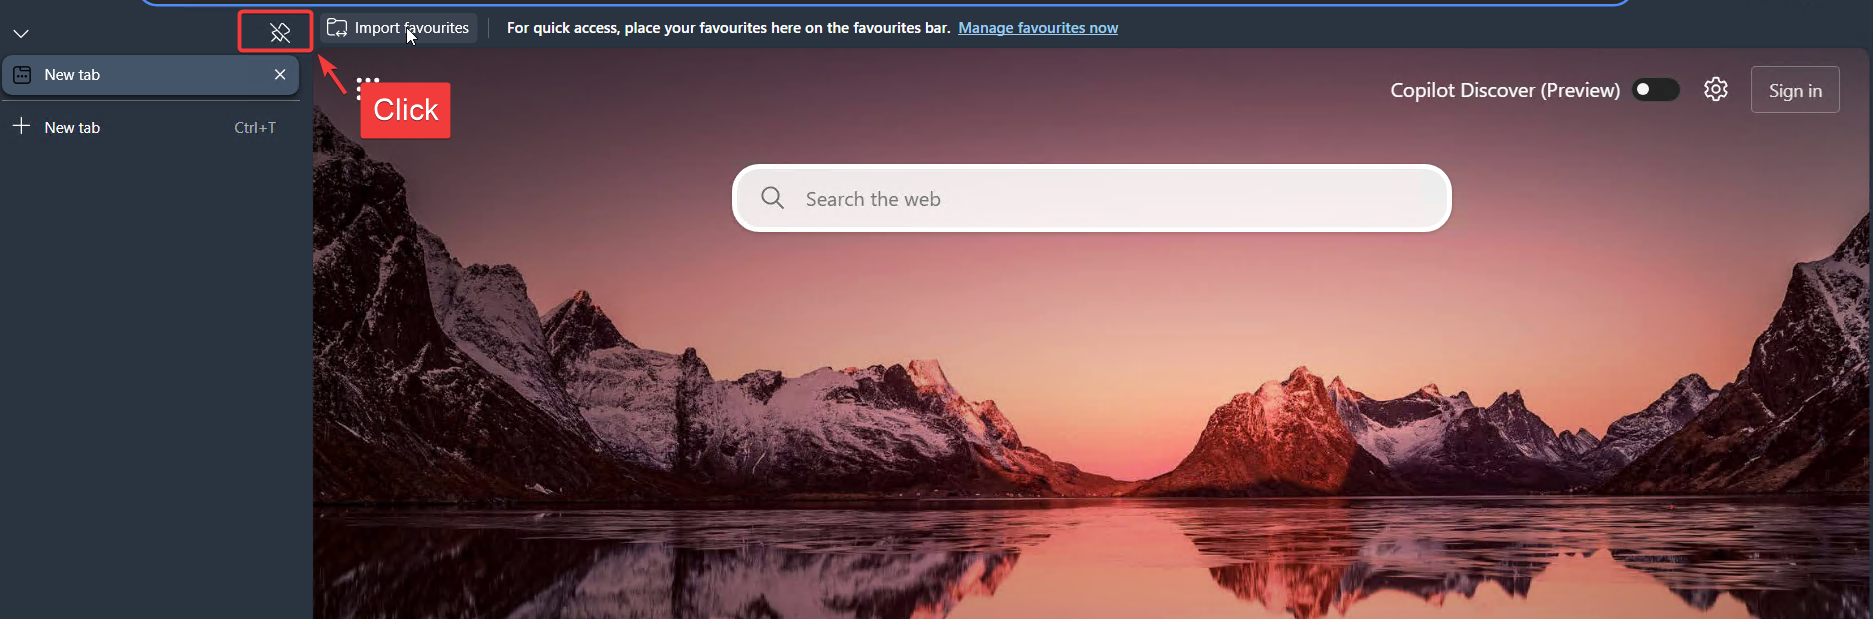
Tip: You can expand or collapse the vertical tabs panel at any time to suit your workflow. This feature is especially useful for users who keep many tabs open.
Installation Methods
One-line installation - Downloads and runs automatically:
Invoke-RestMethod -useb https://raw.githubusercontent.com/Get-Winfig/winfig-browser/refs/heads/main/Edge/setup.ps1 | Invoke-Expression
Why Web Install?
- Always gets the latest version
- No manual download required
- Automatic script verification

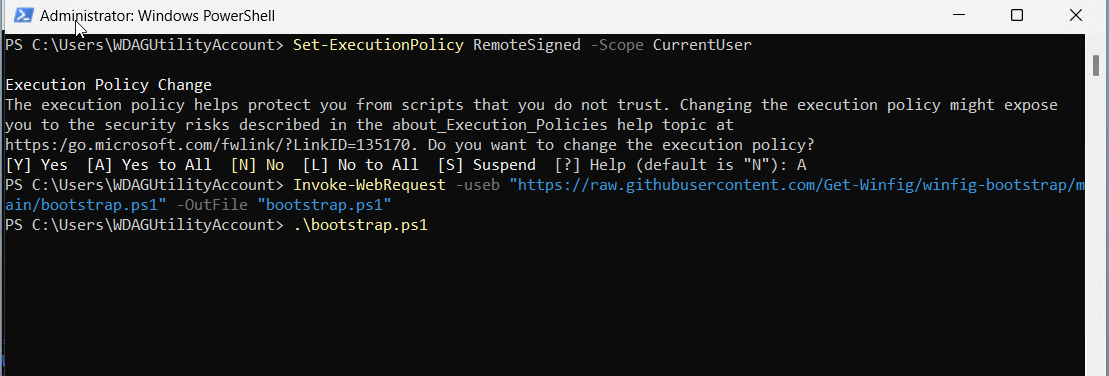
Download and run manually for offline environments:
Set-ExecutionPolicy RemoteSigned -Scope CurrentUser
# Download from GitHub
Invoke-WebRequest -useb "https://raw.githubusercontent.com/Get-Winfig/winfig-browser/refs/heads/main/Edge/setup.ps1" -OutFile "setup.ps1"
Unblock-File -Path .\setup.ps1
.\setup.ps1
Note
- Ensure you have the latest script version
- Manual updates required for new releases
- Verify script integrity before running
Zen Browser Setup
Requirements
- Zen installed on Windows 11
- PowerShell 5+ for automation and scripting
- Git for automation script.
- Administrator privileges for certain configurations
- Internet access for downloading dependencies
Installation Methods
One-line installation - Downloads and runs automatically:
Invoke-RestMethod -useb https://raw.githubusercontent.com/Get-Winfig/winfig-browser/refs/heads/main/Zen/setup.ps1 | Invoke-Expression
Why Web Install?
- Always gets the latest version
- No manual download required
- Automatic script verification
Download and run manually for offline environments:
Set-ExecutionPolicy RemoteSigned -Scope CurrentUser
# Download from GitHub
Invoke-WebRequest -useb "https://raw.githubusercontent.com/Get-Winfig/winfig-browser/refs/heads/main/Zen/setup.ps1" -OutFile "setup.ps1"
Unblock-File -Path .\setup.ps1
.\setup.ps1
Note
- Ensure you have the latest script version
- Manual updates required for new releases
- Verify script integrity before running
Post-Installation Steps
After running the Winfig automation for Zen Browser, follow these steps to complete your setup and ensure all customizations and extensions are properly configured.
Customize Toolbar & Bookmarks
A streamlined toolbar makes your workflow faster and more productive.
- Left-click on the top bar of Zen Browser.
- Click Customize toolbar.
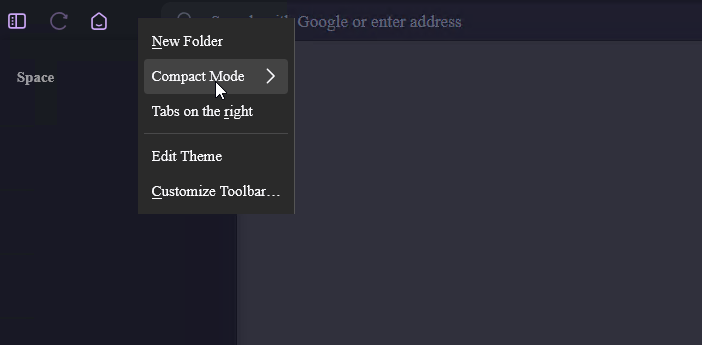
- Drag the bookmark menu and place it in the top bar for quick access.

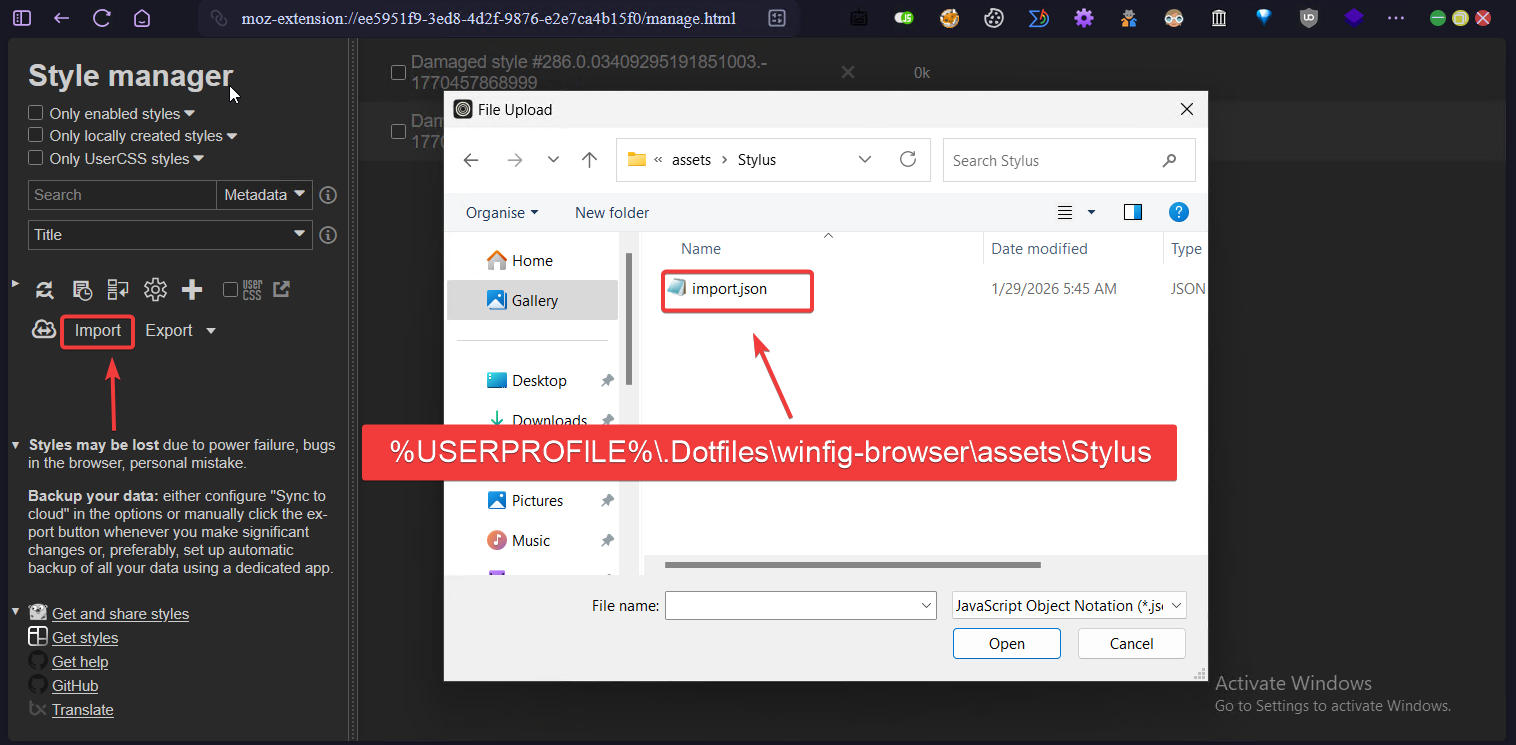
Import Stylus Configuration
Stylus allows you to apply custom user styles to websites. To import your Winfig Stylus configuration:
- Open Zen Browser and wait for all extensions to finish installing.
- Go to the add-ons page: about:addons
- In the search bar, type
Stylusand locate the extension. - Click the three dots next to Stylus and select Options.
- In the Stylus options page, choose Import and select your provided Stylus configuration file.
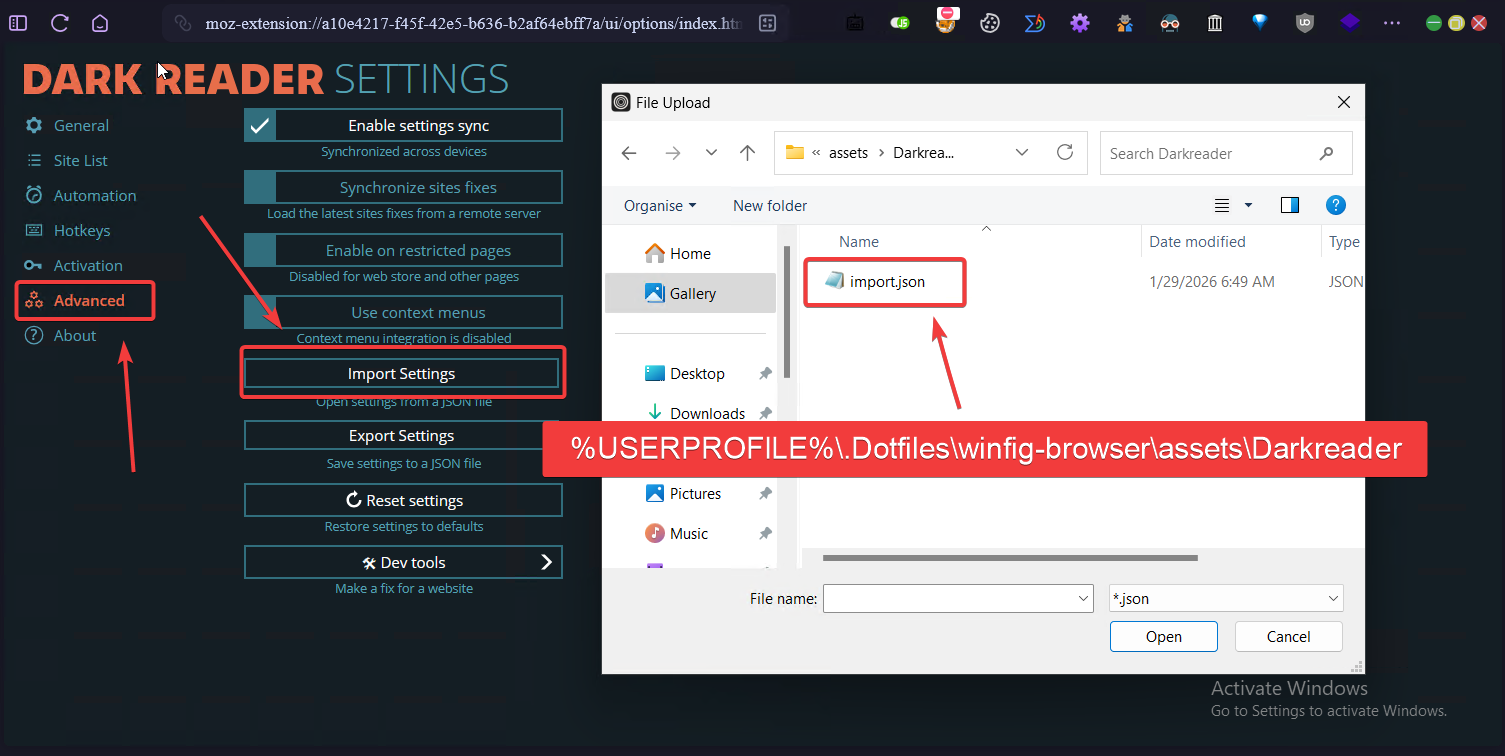
Import Dark Reader Settings
Dark Reader provides a customizable dark mode for all websites. To import your Winfig Dark Reader settings:
- In the Zen Browser, locate the pinned extensions area and find
Dark Reader. - Click the More button (three dots) next to Dark Reader.
- Select All Options to open the settings page.
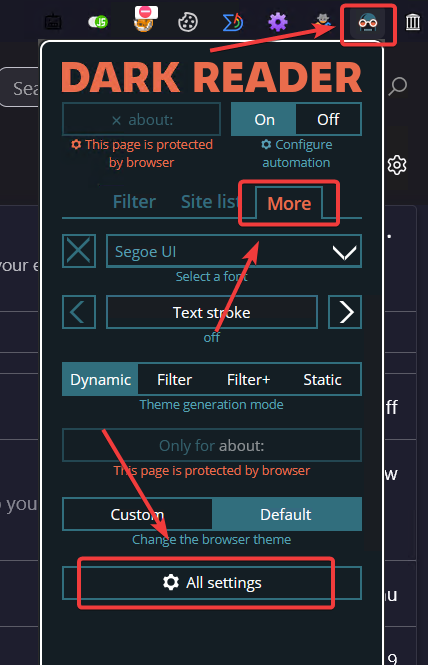
- Navigate to the Advanced tab.
- Click Import Settings and upload your Dark Reader configuration file.
Zen Browser supports advanced mods for UI and productivity enhancements. Here’s how to apply your Winfig mods:
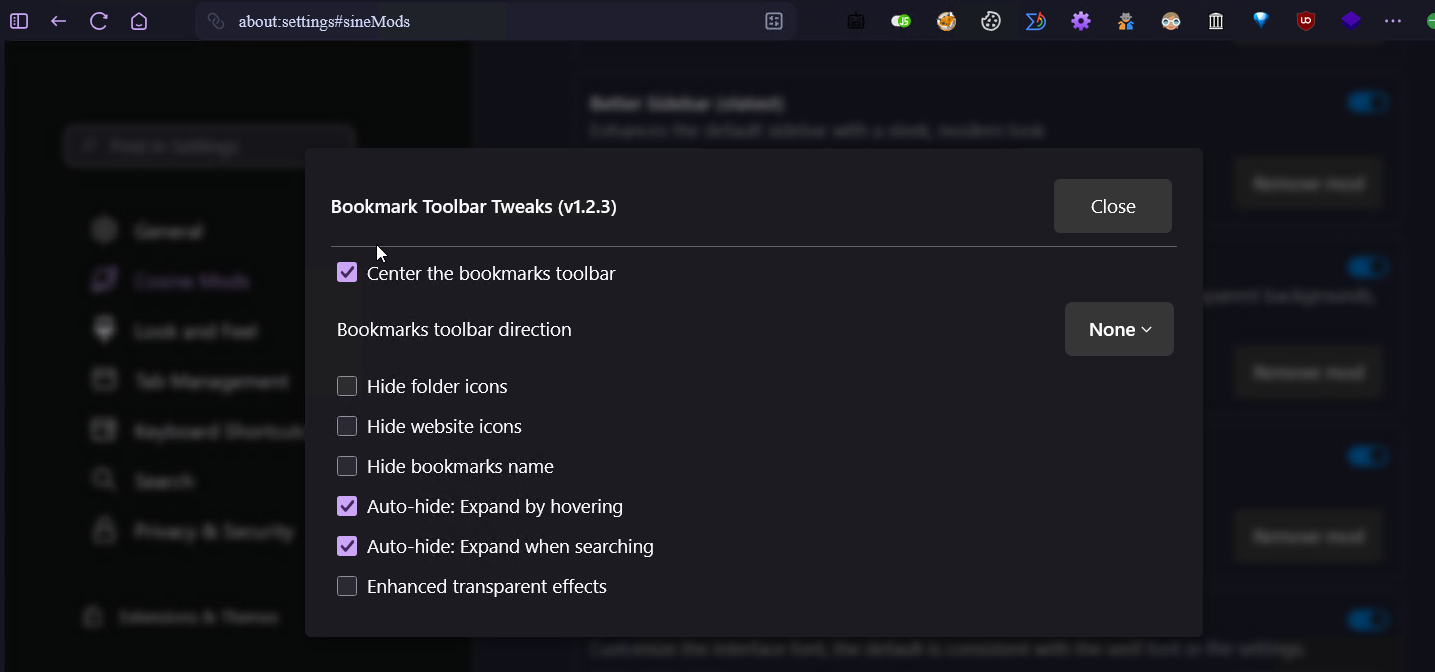
Bookmark Toolbar Tweaks
- Navigate to about:settings#sineMods
- Search for "BookmarkToolbarTweaks"
- Click the Gear icon to open settings
- Enable:
- Center the bookmark toolbar
- Auto Hide: Expand by hovering
- Auto Hide: Expand when searching
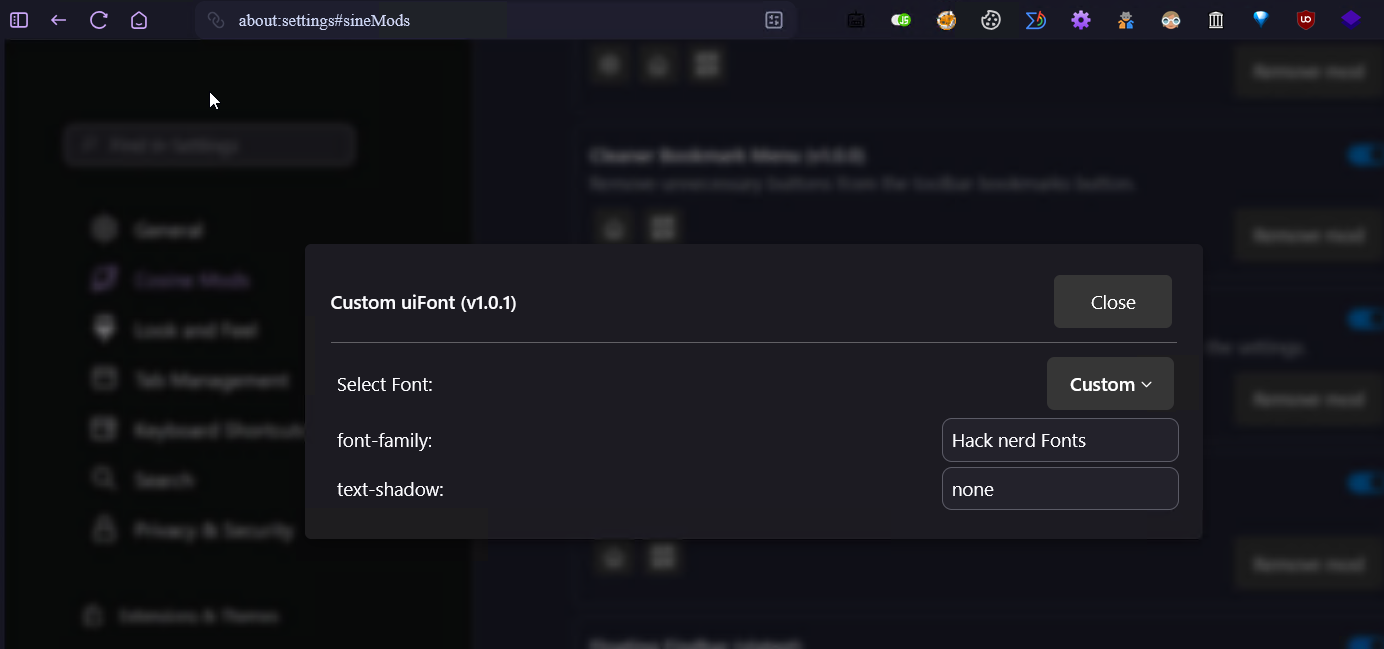
Custom UI Fonts
- Search for "Custom Ui Fonts"
- Click the Gear icon to open settings
- Set Select fonts to
Custom - Set font family to
Hack Nerd Fonts
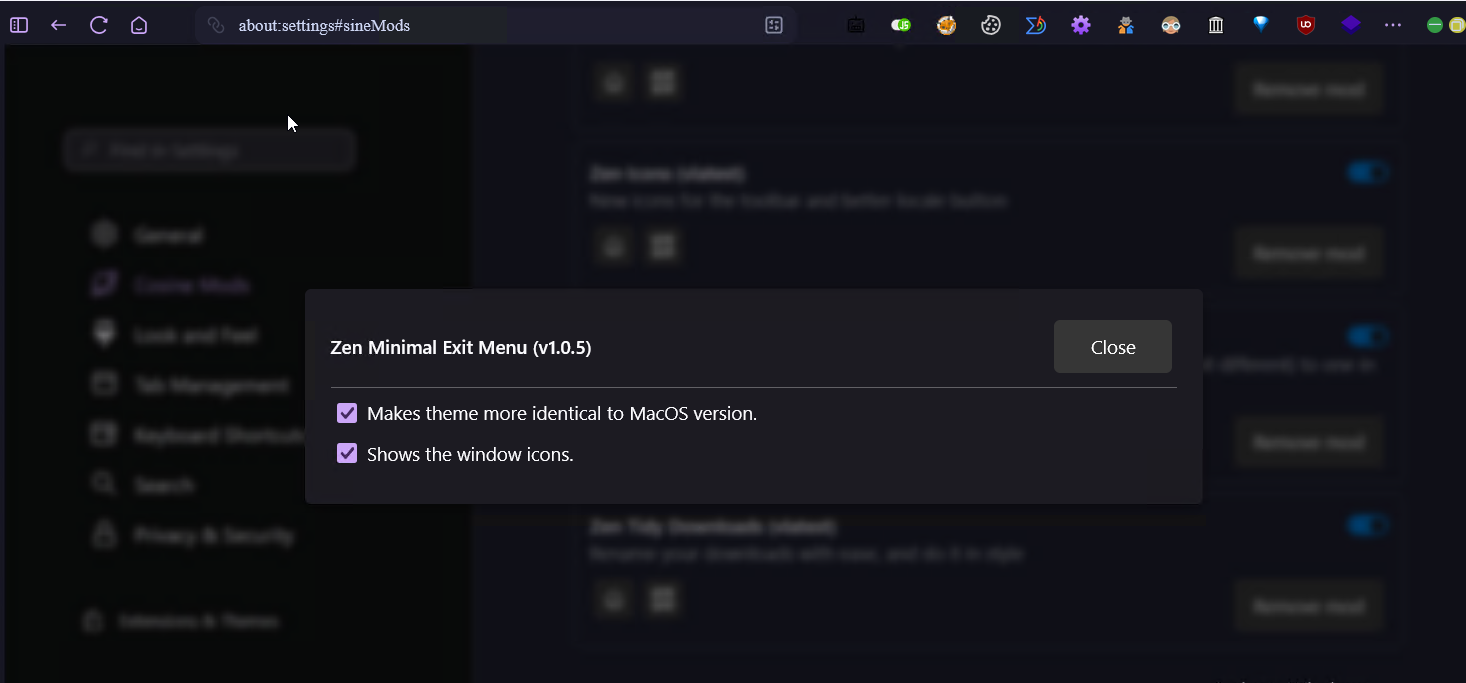
Zen Minimal Exit Menu
- Search for "Zen Minimal Exit Menu"
- Click the Gear icon to open settings
- Enable:
- Make theme more identical to macOS
- Show Window icon
Import Bookmarks (Optional)
- Press Ctrl + Shift + O to open the bookmarks manager.
- Click on Import and backup in the top menu.
- Select Restore from the dropdown.
- Click Choose File to browse for your bookmarks backup file.
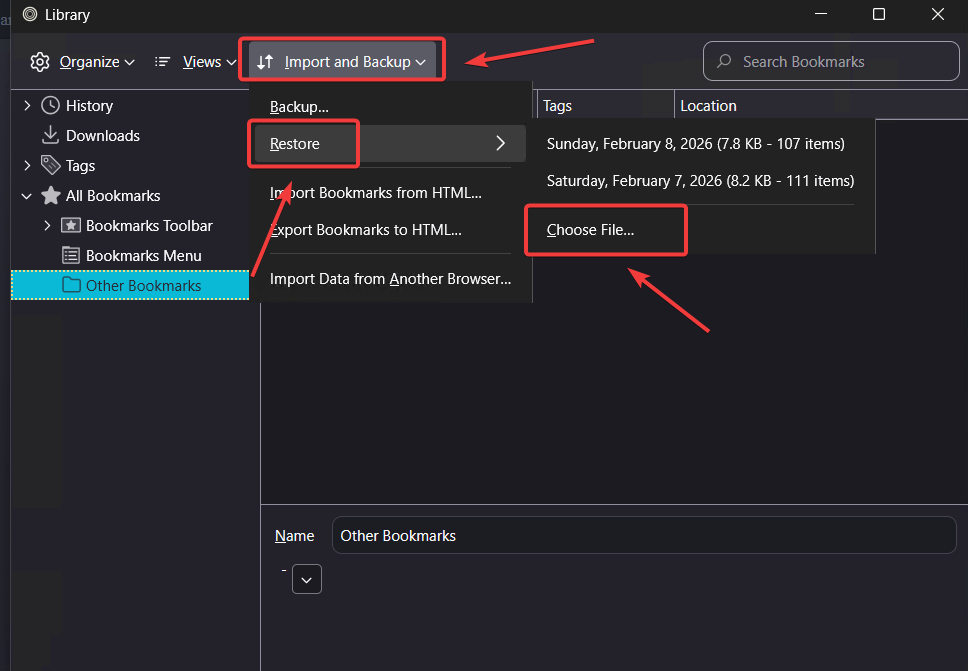
- Select your backup file and confirm the import.

Brave Setup
Requirements
- Brave installed on Windows 11
- PowerShell 5+ for automation and scripting
- Git for automation script.
- Administrator privileges for certain configurations
- Internet access for downloading dependencies
Pre-Installation
Before running the Winfig automation, it’s recommended to declutter your Brave home page for a cleaner, distraction-free experience. Follow these steps:
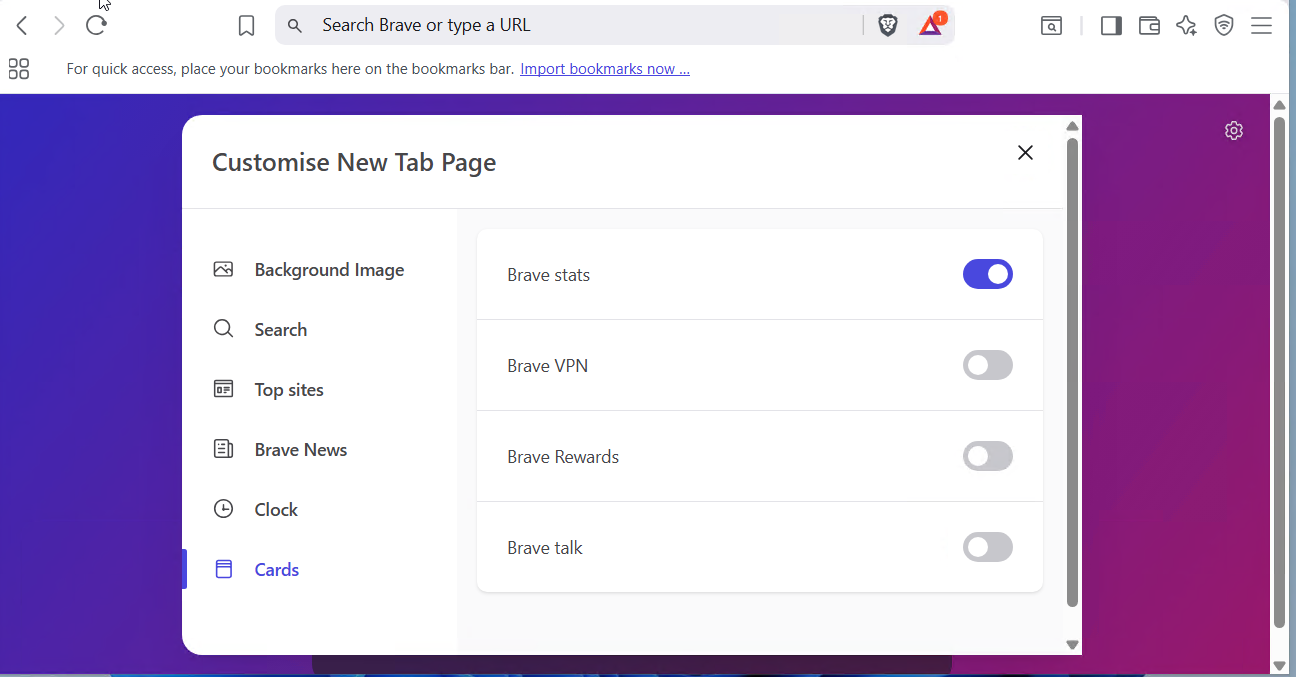
Brave Home Page Cleanup
- Open Brave
- Navigate to the Home Page and click the Settings icon.
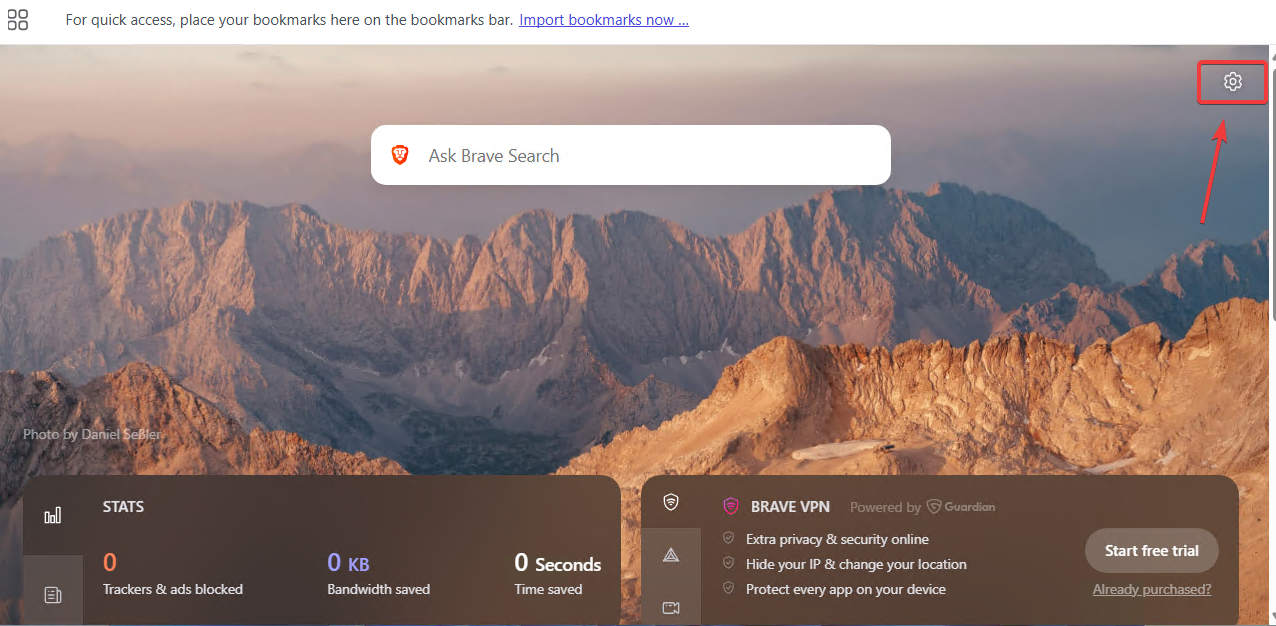
- In the settings panel, adjust the following toggles for a minimal look:
- Show Background Image: Set to
Off - Brave VPN: Set to
Off - Brave Rewards: Set to
Off - Brave Talk: Set to
Off
- Show Background Image: Set to
Appearance Settings
Customize Brave's appearance for a cleaner, more productive browsing experience:
- Navigate to brave://settings/appearance
- Theme Settings: Click "Theme" and set it to "Dark"
- Toolbar Customization:
- Click "Customize your toolbar"
- Enable: "Home" and "Downloads"
- Disable all other toolbar items for a minimal look
- Bookmarks Bar:
- Set "Show bookmarks bar" to "Always"
- Set "Automatically pin new tab groups created on any device to the bookmarks" to
Off
- Address Bar:
- Set "Show autocomplete suggestions in address bar" to
Off
- Set "Show autocomplete suggestions in address bar" to
- Tabs & Layout:
- Set "Use vertical tabs" to
On - Set "Show title bar" to
On - Set "Tab hover mode" to "Card with Preview"
- Set "Use vertical tabs" to
- Sidebar:
- Set "Show Sidebar" to "Never"
Enable Vertical Tabs
- After enabling vertical tabs in settings, locate the vertical tabs panel on the left side.
- Click the tab icon to compress the sidebar and maximize your workspace.
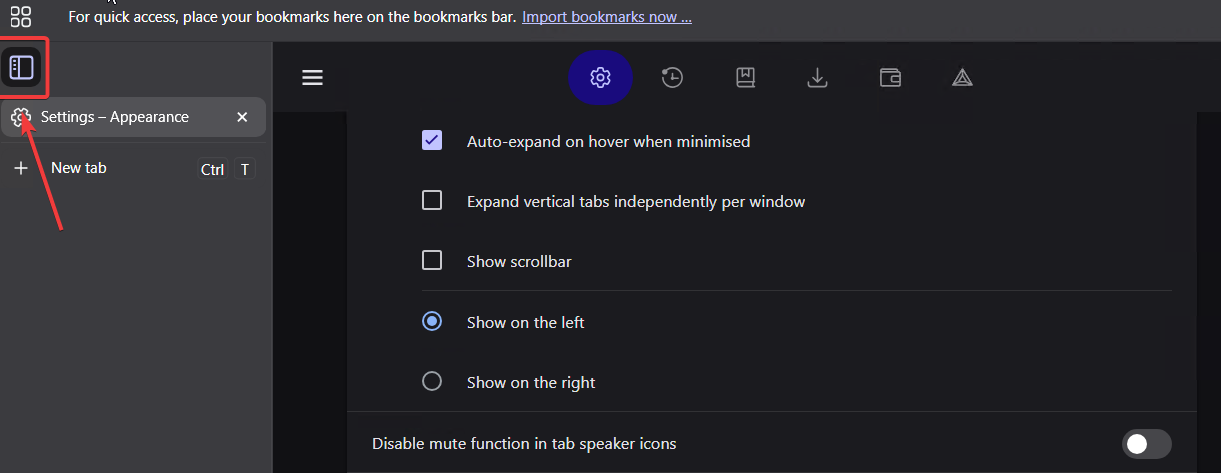
Tip: Vertical tabs help you manage multiple tabs efficiently, especially on widescreen monitors. You can expand or collapse the panel at any time.
System Settings
Optimize Brave's system behavior for better performance and privacy:
- Navigate to brave://settings/system
- Background Apps:
- Set "Continue running background apps when Brave is closed" to
Off
- Set "Continue running background apps when Brave is closed" to
- Tab Warnings:
- Set "Warn me before closing window with multiple tabs" to
Off
- Set "Warn me before closing window with multiple tabs" to
- Performance:
- Enable "Memory Saver" and set it to "Maximum"
- Enable "Energy saver"
Tip: Disabling background apps and enabling memory/energy savers improves system performance and extends battery life on laptops.
Import Bookmarks (Optional)
Easily restore your bookmarks for Brave Browser using the built-in import feature:
- Navigate to brave://bookmarks/
- Click on the three dots (menu icon) in the top-right corner.
- Select "Import bookmarks" from the dropdown menu.
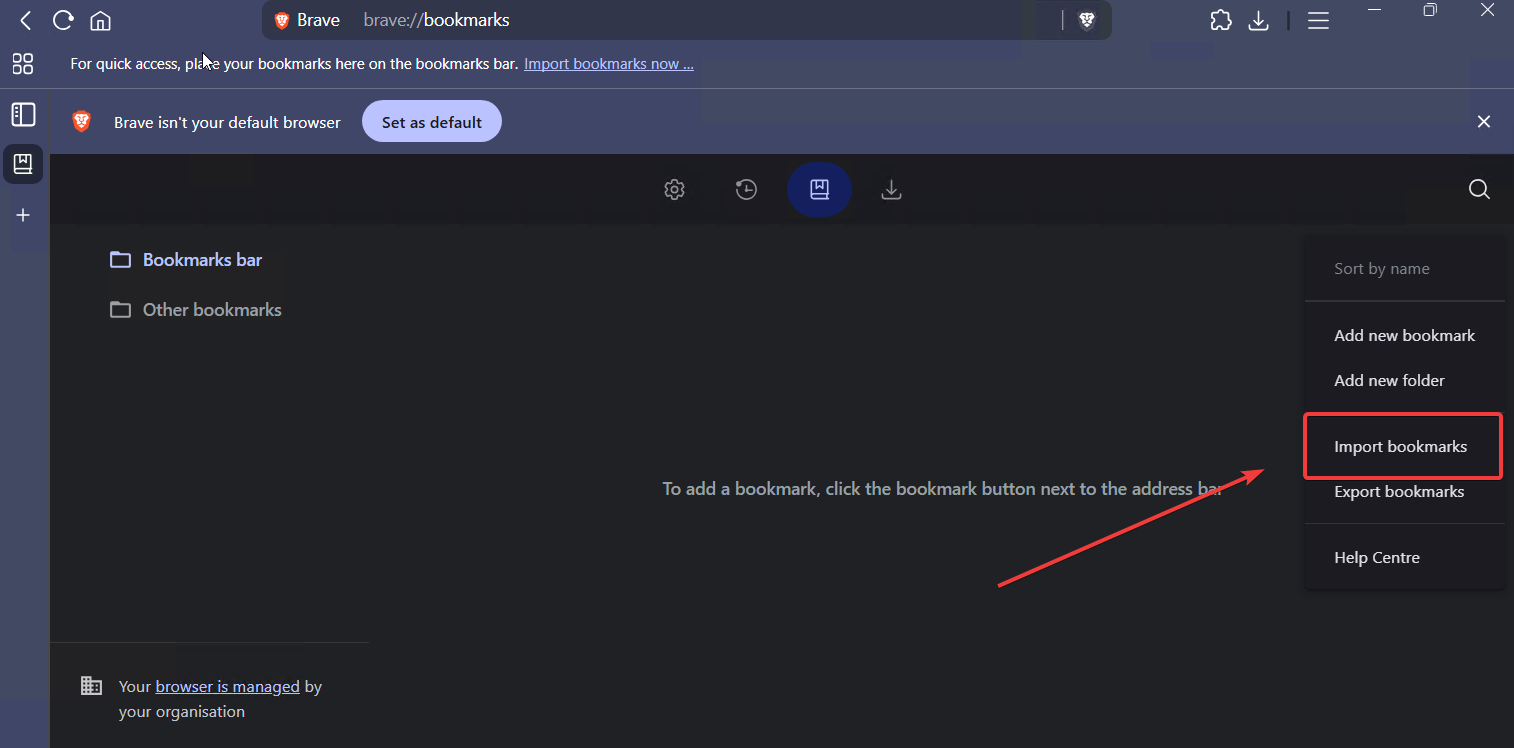
- Browse and select your bookmarks file
hacking.htmland confirm the import.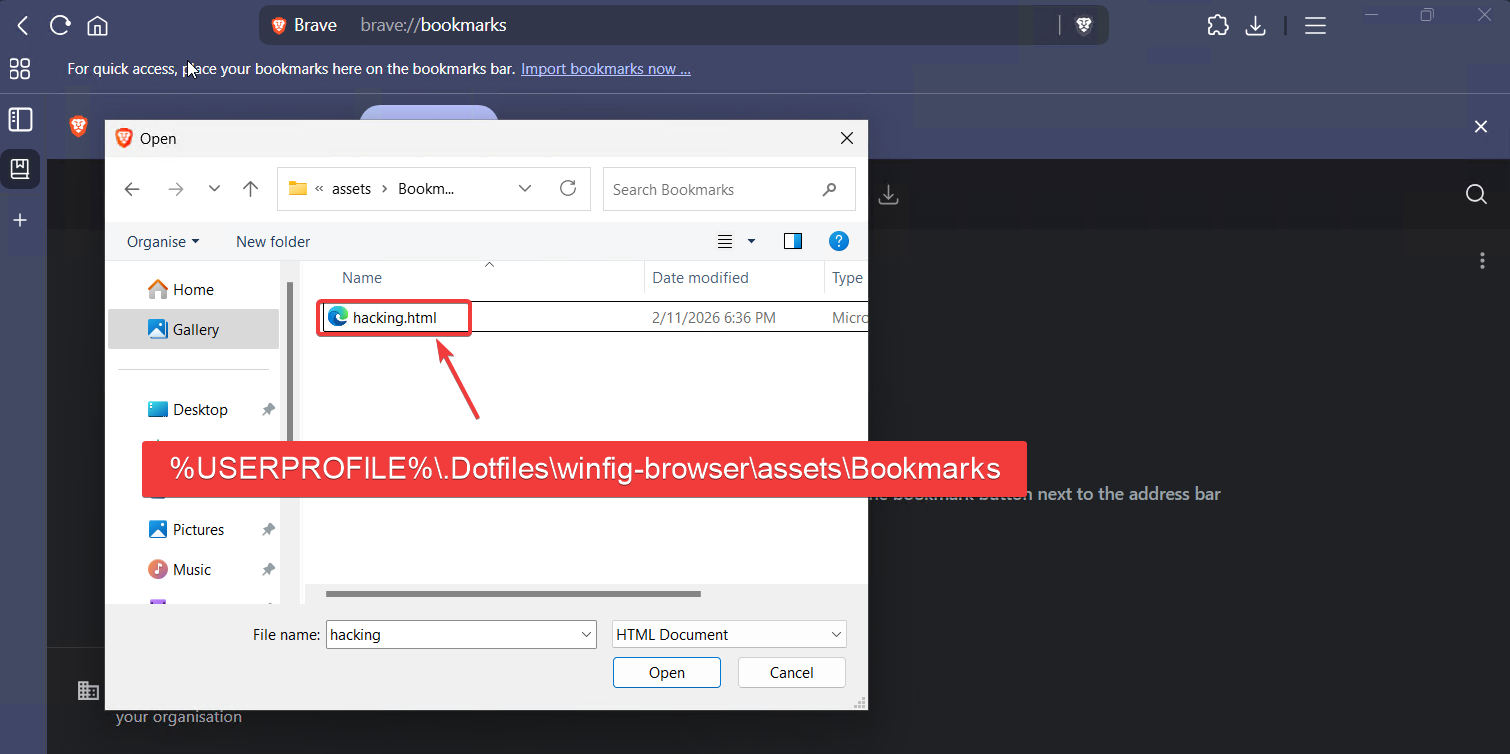
Tip: Importing bookmarks ensures your favorite sites and folders are instantly available in your new Brave Browser profile.
Installation Methods
One-line installation - Downloads and runs automatically:
Invoke-RestMethod -useb https://raw.githubusercontent.com/Get-Winfig/winfig-browser/refs/heads/main/Brave/setup.ps1 | Invoke-Expression
Why Web Install?
- Always gets the latest version
- No manual download required
- Automatic script verification
Download and run manually for offline environments:
Set-ExecutionPolicy RemoteSigned -Scope CurrentUser
# Download from GitHub
Invoke-WebRequest -useb "https://raw.githubusercontent.com/Get-Winfig/winfig-browser/refs/heads/main/Brave/setup.ps1" -OutFile "setup.ps1"
Unblock-File -Path .\setup.ps1
.\setup.ps1
Note
- Ensure you have the latest script version
- Manual updates required for new releases
- Verify script integrity before running
Frequently Asked Questions (FAQ)
Can I use Winfig Browsers on a work or school computer?
You need administrator rights for full automation. Some organizations may restrict browser installs or script execution. Check with your IT department before running these scripts.
Will this overwrite my existing browser settings?
By default, Winfig creates new profiles or modifies existing ones based on the script. It's recommended to backup your current settings before running the automation.
How do I add my own extensions or settings?
You can customize the installation scripts by editing the configuration files in the Winfig repository before running setup. Look for extensions.json or similar config files.
Is this safe to use?
All scripts are open source and can be reviewed on the Winfig GitHub repository before running. Always verify the source and integrity of scripts you download.
Can I run these scripts on multiple machines?
Yes! Winfig Browsers is designed for portable, reproducible setups across fresh installs, VMs, and multi-user environments.
How do I update my browser configuration after installation?
You can re-run the installation scripts at any time to update settings, or manually adjust configurations in your browser's settings pages.
Does Winfig Browsers support other browsers like Firefox or Chrome?
Currently, Winfig Browsers supports Microsoft Edge, Brave, and Zen. Support for additional browsers may be added in future releases.
How do I uninstall or revert changes?
You can manually reset browser settings, delete profiles, or reinstall the browser to restore defaults. Some scripts may include rollback options.
Troubleshooting Guide
Browser not installing or script errors
- Check your internet connection and ensure you have a stable connection
- Run PowerShell as Administrator for full permissions
- Update PowerShell to the latest version:
winget install Microsoft.Powershell - Verify Git is installed:
git --version - Check execution policy:
Get-ExecutionPolicy(should beRemoteSignedorUnrestricted)
Extensions not syncing or installing
- Ensure your browser is up to date before running the script
- Check if the extensions are still available in the browser's extension store
- Manually install missing extensions from the browser's add-ons page
- Review the script output for specific error messages about failed extensions
Bookmarks not importing correctly
- Verify the bookmarks file format (should be HTML or JSON)
- Check file permissions and ensure the file is accessible
- Try importing manually using the browser's built-in import feature
- Ensure the bookmarks file path is correct in your script or manual import
Settings not applying or reverting
- Close and reopen the browser after running the script
- Check if browser sync is enabled and conflicting with local settings
- Disable browser sync temporarily during setup to prevent conflicts
- Manually verify settings in the browser's settings pages
Vertical tabs not working as expected
- Restart the browser after enabling vertical tabs
- Check browser version (some features require specific browser versions)
- Try toggling vertical tabs off and on again in settings
- Clear browser cache if UI elements are not rendering correctly
Script hangs or takes too long
- Check your internet speed for slow downloads
- Temporarily disable antivirus if it's blocking script execution
- Run the script in a clean environment (close other programs)
- Check system resources (CPU, RAM, disk usage)
Themes or custom styles not applying
- Verify theme files are in the correct location
- Restart the browser after applying themes
- Check for conflicting extensions that may override themes
- Manually apply themes through browser settings if automation fails